One of the most powerful aspects of email marketing is using an email automation series. You can create an email automation for free with MailerLite.
If you’re not quit familiar with them, email automation (also known as an autoresponder) is simply a series of pre-written, scheduled emails that are automatically sent. In most cases, this happens when someone joins your subscriber list. With MailerLite, they are known as Automation Workflows.
There are a lot of benefits to using email automation. It saves a ton of time. It allows you to plan out your emails, eventually leading people to what you want them to do. It creates an on-going conversation with your email list subscribers to build trust and authority.
Sound good?
Good. So, here’s how to use MailerLite’s free email automation tool to build your own customized automation. Be sure to scroll down to the bottom of the post for an on-screen, step-by-step, awesome video tutorial.
Please note that some links below may include my affiliate link. If you decide to purchase any of these products or services through any of these links, it will be of no extra cost to you, but I may receive a compensation.
Step 1: Write Out Your Email Automation Series
“Prewritten” means written pre… OK, it means your emails are already written.
This is the power behind email automation, and it’s SUPER-important. Spend some time planning out your series of emails. Ask yourself a few questions.
What do you want your subscribers to eventually do during or at the end of the series?
What valuable information can you provide in your emails?
How can you make your emails relevant to the reason why people subscribed to your list in the first place?
How can you build on each email as they are sent?
This will help you map out your emails and provide some direction.
Write your emails as if you were talking to someone. There’s no need to get all stiff and over-professional. Just be you.
Add relevant links in your emails, but don’t overdo it (and it’s easy to overdo, so be careful!).
PRO TIP: Tell people what to expect in the next email. Let them know when they will get it, and give them a preview of the next subject line so they will recognize it in their inbox.
Step 2: Set Up Your MailerLite Email Automation Settings
When creating an email automation workflow with MailerLite, make sure you link it to a subscriber group. This can be an existing group or a new one, even if it doesn’t yet have any members.
To create a new automation, click “Automation” tab at the top. Then click the “Create a new workflow” button.
Name your workflow in the “Workflow name” box (you can change this later if you need to).
In the “Select a group” drop-down section, select the email subscriber group or group segment you want tied to the automation workflow. Or you can create a new group at this point.
In the “Select a trigger” option, you’ll then need to select when the automation is triggered. For example, select the “When a subscriber joins a group” option.
Typically, an email automation is triggered when someone joins your subscriber list (we’ll stick with this for our examples, mmmkay?).
Save your settings.
Learn how to create a landing/lead-capture page with MailerLite here.
You’re now ready to start adding your emails. (More details on this in the video below.)
PRO TIP: You can always create alternate workflows later tied to different subscriber groups or different group segments (sub-groups).
Step 3: Add Emails and Delays in Your Email Automation
You can begin adding Emails and Delays to your automation workflow by clicking the plus (+) button, and then selecting what you want to take place next.
When someone does join your email subscriber list, make sure a welcome email is ready to send. This is typically a short email welcoming them to the list and letting them know what to expect. This is typically sent immediately after someone subscribes.
So, for this example, add an initial welcome email. After you click the plus (+) button, select the Email icon. You can begin adding the content of your email. Give it a good, welcoming subject line! (The subject line will also help you identify all the emails you place in your workflow.)
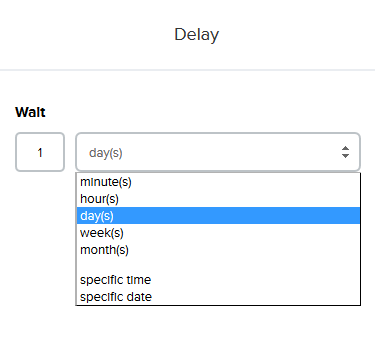
After you add your first (welcome) email, decide what you want to do next in your email automation. For example, you might want to add a delay, say, of one day.
When you click on the Delay icon, you select the length of the delay (the amount of time that goes by). You can select minutes, hours, days, weeks or even a specific day/time.
After you set a delay, you might want to add your second email. You can do this the same way you added your first.
Keep doing this until you have added all the delays and emails you want.
PRO TIP: The delays and emails in your automation will be determined by your content and overall purpose. So, think about what your eventually want your subscribers to do (buy from you, hire you, take your course, etc.).
Step 4: Add Email Subscriber Conditions and Actions
The second part of creating your email automation workflow is adding conditions and actions. These can be done exactly the same way as adding delays and emails. You might also want to consider adding these (wherever relevant) as you are also adding delays and emails.
When you click the plus (+) button in your workflow the condition and action icons appear along with the delay and email icons.
Why would you want to add a condition? Let’s say you want to send a specific email to people who clicked on a link in the previous email. Or maybe to people who did not open the last two emails.
Setting a Condition allows you to do that.
Basically, it creates a fork in the automation workflow (see the pic below). Those who meet the condition (indicated by a green thumbs-up) are sent to one side and those who do not meet the condition (indicated by a red thumbs-down) are sent to another side. You can then continue your workflow for each side of the condition.
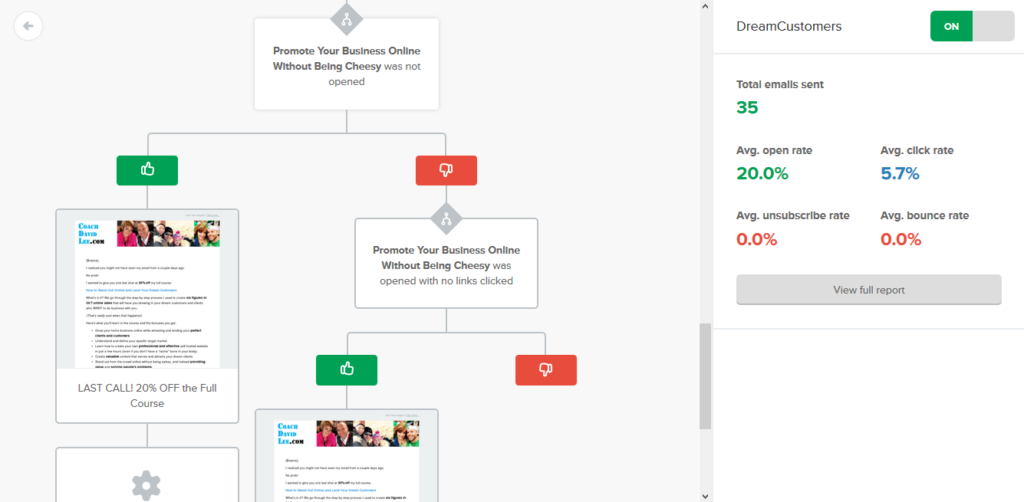
You can add new conditions based on different actions people take.
Pretty cool, huh?
You can play around with this to help you further lead people to what you eventually want them to do.
What about setting an action?
You want to set an action when you want a subscriber moved or copied to another list.
As I said earlier, most automation workflows are really for new subscribers. There are a lot of ways to add people to your subscriber list: lead-capture page, pop-up form, embedded opt-in form, etc. And they may have entered your list for a lot of different reasons.
So, after they go through your email automation, you might want to move their email address to a general subscriber group. Or, you might want to create a separate group for people who take a lot of action through your automation (open emails, click links, etc.).
PRO TIP: Test your email automation. Once you’re done setting up, make sure to test your automation with your own email. Take notes of what you think you can improve.
Hope you got some value from that, be sure to watch the on-screen video below. Leave any comments or questions below!
David Lee
Call Me: 469.207.1595
Email Me: DreamAgain@verizon.net
Let's Connect:
Facebook.com
Twitter.com/DavidLeeCoach
YouTube.com


This is a really easy to follow tutorial, thanks for your great instructions. I’ve been thinking of setting up an automatic welcome email to my new subscribers for a while!
Lianne | Makes, Bakes and Decor
Welcome! Hope it helped. I am in the process of create a full email marketing course.